I would want to find a way to mix my song somewhere in between this track and the Kelly Clarkson track, even though I personally like the mix of this song, I wouldn’t want to make the drums sound so low in the mix.
Reference Track 1 for Assessment 1
I have chosen this particular track due to the balance of the vocals and instruments.
The song that I’m recording is an original which I wrote with Francesca. Ideally I would want to mix this song in a way that would highlight the vocals and the main instruments, bass guitar and piano especially.
Microphone Stereo Techniques

This is a A-B stereo setup. 2 DPA 4090 Condenser, omnidirectional, measure 20-40cm apart from eachother.
(Gives stereo width: closer the mic is to eachother, less wide the stereo is)

Spaced NOS stereo setup. 2 AKG 414
Distance 30cm, set in a 90 degree angle (Cardioid) This creates stereo image.

Decca Tree mic setup.
3 mics equal distance from eachother (60cm-120cm). Omnidirectional mics: 2 AKG 414, 1 DPA 4090
(Stereo derived through time of arrival)

X-Y setup.
Cardioid directional (coincident). set in a 90 degree angle, can either use the AKG 414s or Neumann TLM 313s (Condenser mics)
Stereo derived from level difference though they do not pick up levels from behind the mic.
With directional mics, the closer you are the more it picks up low frequency (eg “bass-y ” sounds)

Blumlein set up.
(Coincident) set in a 90 degree angle, directional (figure of 8)
+phase in front and -phase behind the mic
Mics used are the Royer O121
MS Microphone Techniques and MS matrix

Here are 2 AKG 414.
Top mic works as a cardioid and bottom one works as a figure of 8.
This is to pick up audio from the front/middle and the sides (bottom mic)
We set up these mics so close together so that they are kept in-phase with one another, otherwise they would pick up the audio at different times. (patching them in the wallbox, the middle mic uses input 1 while the side mic uses input 2)

MS Matrix in Pro tools

Vertical line shows the middle mic signal and horizontal line would show the side mic signal.
set up an Oscillator to test that that matrix was setup correctly
Glyn Johns Technique

2 snare drum mics. The mic to the side of the snare was a Neumann TLM 103 condenser (cardioid) mic and the one to the far left of the shot (above the snare) was The Shure SM57, dynamic (Cardioid)

2 overhead mics, both mics need to be of equal distance to the snare’s middle. Mics used were AKG 414 condenser (with switchable polarity) set to cardioid

The mic which was used for the kick-drum was a Sennheiser e-602, dynamic (Cardioid)
This technique is ideal when you want a recording that has a clear sound yet no unnecessary noises.
Reference Track No 2
Basic Eq-ing on ProTools
Whilst in mixer window, click underneath INSERTS, then click PLUGINS, EQ and then CHANNEL STRIP.
In the EQ section, at the bottom, turn ON FLT 1 and drag the blue dot to adjust eq, repeat process with FLT 2 to adjust eq.
Top & Tail edit on Pro-tools
Mixer Window (Command =)
Zoom in and out (R)
To come out of mixer window (command =)
Project window: Right column, ruler symbol and click extreme OR ruler symbol hold and drag down/ Click before sound peak, press A/ Left click in blank, press TAB/ Press SHIFT and drag to where the track starts/ (Highlighted area) Command F (fades)/ Zoom out R/ go to the end of the track and click infront of the last peak of sound/ Right click of that and press S/ Hold down SHIFT and drag to the final final peak/ (Highlighted area) Command F (fades) and press ok
Shure SM57 mic
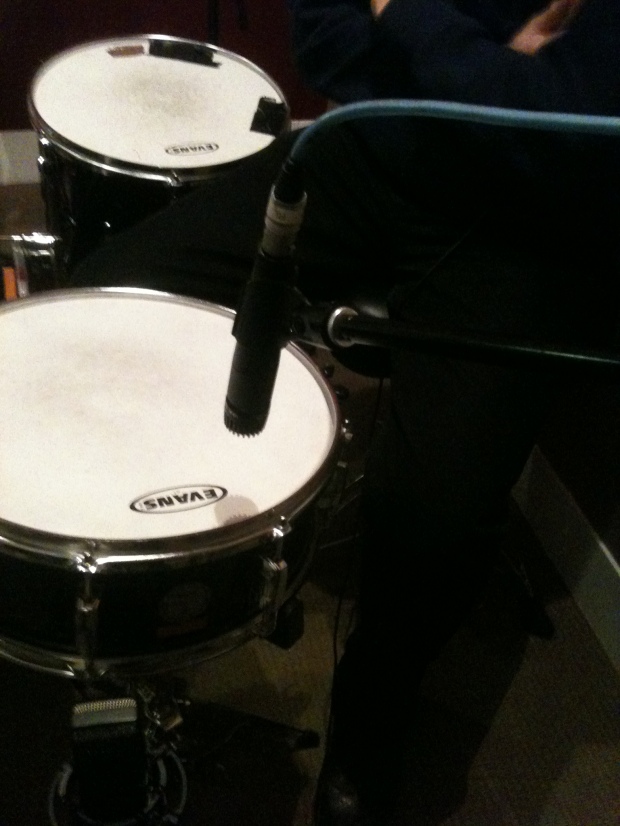
Mics for the Snare
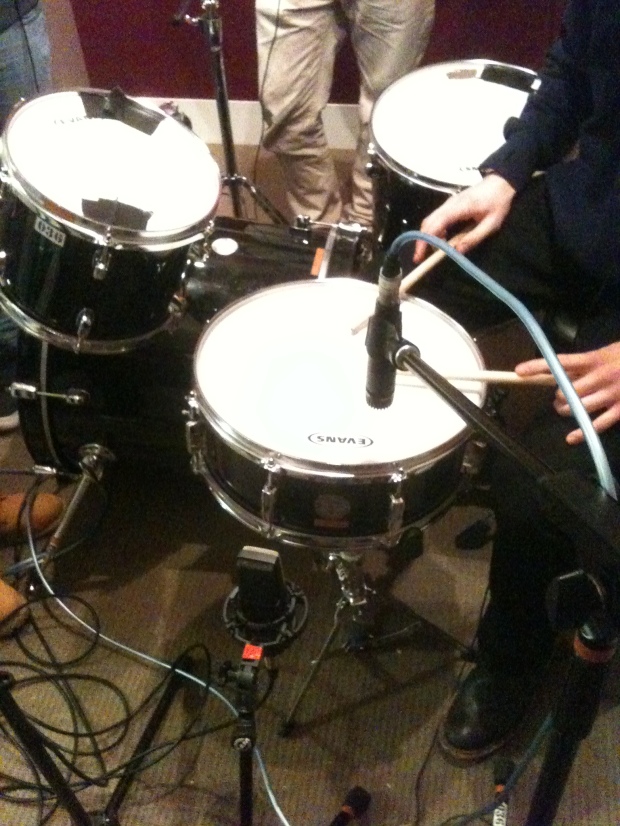
SM57 on top and a AKG C414 CONDENSER Mic to the side of the snare.
C414 adds snap to the thud of the SM57
The dampness and attack of the snare changes when the C414’s height changes.
